


Practical tips on how to stretch the mesh so that the fence will serve you for many years
27. 9. 2023
Building a fence that will not only look good, but also fulfill its function and also serve for many years is not entirely easy. You cannot do without a precise procedure. So let's take a look together at how to stretch the mesh and build a wire fence that will be high quality, strong and durable.
If you are considering what to fence your property with, a 4-cornered woven wire fence is the easiest solution. Its installation is quick, you can easily manage it yourself with a little skill, and it is also one of the cheapest options. So let's see how to do it.
Which mesh to choose?
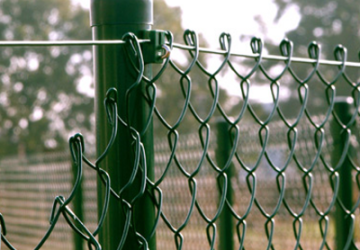
Before you start fencing your property, you need to choose a suitable mesh. The most commonly used type is plastic-coated mesh with a galvanized steel core, which is durable, corrosion-resistant, and drains water well. You can choose from several different wire diameters, which affect both the lifetime of the mesh and its price . In general, the stronger the wire, the more durable, which is why we offer the strongest and strongest meshes on the market.
In the range of wire fences, you will find either classic square mesh or spot-welded or panel fencing . Of course, we also offer gates and goals , concrete screeds , accessories (tools, clamps, shading nets, etc...)
The spot-welded mesh stands out for its strength and longevity. It is especially suitable where you need really solid and reliable
Mesh with tension wire or without braided tension wire ?
An often-discussed question is whether to choose a mesh that is already equipped with a binding wire, or rather without it. Although it might seem that the installation of mesh with tension wire is easier, the opposite is true. If you want to choose an easier option to install the fence, which will allow a better shutdown, then definitely get a green mesh without a tension wire . We also offer mesh without additional charges. e.g. wire in the modern color anthracite RAL7016 (dark gray color) or other colors, extra strong 3mm wire, for tennis courts, with other mesh sizes, etc... Galvanized mesh is still popular because it is strong . Conversely, for some applications (buildings, temporary fencing, forest fences, etc...) only cheap forest mesh is sufficient .
Don't underestimate preparation. Thorough preparation is important - and this is doubly true when building a fence. If you are going to fence a new plot of land where you do not yet have posts anchored, you will first need to design the fence:
Using stakes and string , mark out where the fence will lead (don't forget to follow the legal provisions regarding buildings).
Plan the placement of the posts , which should be placed at a distance of 2.5 meters (ideally) to a maximum of 3 meters. Always place the starting and ending (corner) posts first and measure the distance between the remaining posts.
In the places where the posts will be, dig or drill a foundation hole, which should have dimensions of approximately 30x30 cm to a frozen depth of 80-90 cm. Setting the post into the ground is usually only done within approx. half of the concrete bale, while making sure that the lower bracket for tensioning the wire is approx. 3-5 cm above the ground. To save labor, you can use a hand digger , hand or power drill to dig the holes.
Pour mixed concrete into the prepared hole to 1/3 to 1/2 of its depth and compact. Build the first post on this foundation. Take the level to hand, level the column thoroughly and then compact the concrete with which you sprinkled the column. Check that the column remains level.
TIP! For concreting posts, you can choose either a mixture of ready-made concrete, which you simply mix with water, or mix one part of cement with six parts of gravel and sand in a wheel and add the appropriate amount of water. Secure the first post prepared in this way with a side strut . This is mounted up to 2/3 of the height of the post and should be placed every 25 meters of a straight section or corner and end of the fence. Also on every gate and goal post. The struts are mounted on the posts using sleeves . Now you can continue with the concreting of the remaining posts. After they are finished, let the concrete harden thoroughly (ideally for a week), only then you can start stretching the mesh.
How to stretch tension wire? Once you have the posts ready, it's time to tension the tension wire . It is attached in two or three places depending on the height of the fence. If the height of the fence is up to one meter, only the upper and lower tension wire is sufficient, for higher fences it is also advisable to use the middle wire. The upper tension wire serves as the main supporting element of the entire mesh, and the middle and lower tension wire as a support. The tension wire is clamped from the beginning to the end post, between which there are continuous posts that create several fence fields. Use one piece of wire from the start post to the end post.
The tension wire is attached using tensioners or ratchets , which are installed on posts with struts. Once you've attached the turnbuckles to the posts, you put tension wire into it at the start and end posts and manually turn it off as much as possible. You can cut off the excess end of the wire, and then close the wire. Once the wire is completely off, fix it in the clips on the continuous posts. Attach both the top, middle and bottom tension wire in the same way.
How to stretch the mesh? If you managed to turn off the tension wire, you can start stretching the mesh. First, unroll it on a flat surface (carefully, do not use brute force) and measure the required length. Then hang the mesh roughly on the tension wire around several hooks. On the first post, fasten the mesh with the binding wire, passing the wire through each mesh of the mesh and wrapping it around the posts. Before the mesh can be attached to the last post, it needs to be manually tensioned as much as possible. Once you have the mesh thoroughly off, attach it to the top and bottom tension wire hook by hook. The mesh is then attached to the central tensioning wire using additional accessories, specifically using a binding wire or VR clips .
How to connect roles? Mesh without tension wire has the great advantage that you can easily disconnect and connect it. To disconnect the mesh, it is enough to weave one vertical wire of the mesh in the desired place and thus divide the mesh into two parts. Using the opposite procedure, you then connect the mesh to each other to achieve the desired length.
How to tension the welded mesh? If you have decided to use welded mesh for greater durability, you will not need supporting tension wires - just attach it to classic round posts or posts with a molding. Place the mesh roll next to the first post and unfold it along its entire length. Attach to the first post and then fix it with a binding wire and clamps (for classic posts) or with pliers and clips (for posts with a molding). Then all you have to do is turn off the mesh with crepe pliers.
How to tension mesh with tension wire? If you purchased a mesh with a tension wire, you will proceed similarly to a mesh without a tension wire. The only difference is that hanging and attaching the tension wire takes place at the same time as the mesh, so you do not do it separately. In addition, you don't have to untangle this mesh on the ground, just place it next to the first post, where you fix it, and then unroll it to the last post.
Assembly instructions for other types of mesh can be found in the DOCUMENTS tab bar for a specific mesh. In the tab bar there are also video instructions, technical parameters, certificates, etc.
FINAL ADVICE : When building the posts and stretching the mesh, proceed with caution, care and deliberation. Only a correctly installed fence is a guarantee of its long life, good appearance and protection of your property.
